Win3D and Axes

Win3D and Axes |
|
| Tutorial Home | ||
| Preliminaries |
This tutorial assumes that you are working in Eclipse and that you have Eclipse started up. If you do not, please see the Java introduction tutorial. If you are working in the CS department labs you should already have the Java3D packages loaded as well as the edu.byu.phun package. If you are working on your own machines, these must be installed and it is up to you (not the TA) to make certain these are in place. |
|
| Creating a Java package | Every program that you write in CS 142 should be in its own package. This will simplify many things for you. For this tutorial, create a package called "tutorial". If you do not know how to create a package, see the Java introduction tutorial. | |
| Creating a basic program |
Every program begins with a class that contains the main(String [] args) method. The main method is where our program will start. We will call our starting class TutorialMain. The code for this class is as follows:
The above code is the starting point for any 3D program. When you create a new class in the tutorial package the "package" line, the basic comment and the "public class TutorialMain" lines will be created. You must add the "import edu.byu.phun;" line and you must add the main method as shown. |
|
| Creating a 3D window |
All 3D graphics must be created inside of a Win3D window. This window knows how to display 3D graphics and also knows how to update itself whenever you add objects to the the window. To create new Win3D add code to your TutorialMain class so that it looks like this: This code will cause an empty window to appear on the screen as shown below: The statement "Win3D win = new Win3D("Tutorial",10,20,400,300);" tells Java to create a new Win3D object and place it in a variable named "win". This object represents the empty window. The first parameter, "Tutorial", gives the title of the window. The values 10 and 20 are the coordinates of the upper left window on the screen. 10 says that the window is to be 10 pixels from the left edge of the screen and 20 says that the window is to be 20 pixesl from the top of the screen. The statement also says that the window is to be 400 pixels wide and 300 pixels tall. |
|
| Adding axes |
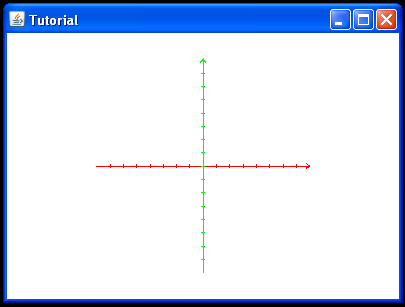
We have an empty window, but there is nothing in it, which is not very interesting. The easiest thing to add is a set of coordinate axes. These are very helpful in understanding where we are in 3D. It can be very confusing to know at any time. For most of our programs we will start by adding coordinate axes to help us with our work. We can always comment them out later so that they do not clutter up our picture. To add the axes modify your program as shown below:
The line "win.add(new Axes());" will create a new Axes object and will add it to the window that we named "win". The window will change to that shown below. There are 3 arrows shown, one for each axis: X (red pointing to the right), Y (green pointing up) and Z (blue pointing towards us). The colors are important because they identify which axis is which. |